

This guide is part of our growing collection on HRIS integrations. We’re continuously exploring new apps and updating our HRIS Guides Directory with fresh insights.
Introduction to Workday API
Overview of Workday
Workday has become one of the most trusted platforms for enterprise HR, payroll, and financial management. It’s the system of record for employee data in thousands of organizations. But as powerful as Workday is, most businesses don’t run only on Workday. They also use performance management tools, applicant tracking systems, payroll software, CRMs, SaaS platforms, and more.
The challenge? Making all these systems talk to each other.
That’s where the Workday API comes in. By integrating with Workday’s APIs, companies can automate processes, reduce manual work, and ensure accurate, real-time data flows between systems.
In this blog, we’ll give you everything you need, whether you’re a beginner just learning about APIs or a developer looking to build an enterprise-grade integration.
We’ll cover terminology, use cases, step-by-step setup, code examples, and FAQs. By the end, you’ll know how Workday API integration works and how to do it the right way.
Looking to quickstart with the Workday API Integration? Check our Workday API Directory for common Workday API endpoints
What Workday Does
Why Workday Matters to Organizations
- Single Source of Truth: Workday centralizes HR and finance data, ensuring accuracy and consistency across the organization.
- Efficiency: Automates repetitive HR and payroll tasks, saving teams hours of manual work.
- Compliance & Security: Keeps sensitive employee and financial information secure while meeting regional regulations.
- Scalability: Grows with your business, supporting small teams as well as global enterprises.
- Real-time insights give leaders visibility into workforce and financial health.
Workday API integration use cases
Workday integrations can support both internal workflows for your HR and finance teams, as well as customer-facing use cases that make SaaS products more valuable. Let’s break down some of the most impactful examples.
1. Analyze Employee Performance and Adjust Compensation
Performance reviews are key to fair salary adjustments, promotions, and bonus payouts. Many organizations use tools like Lattice to manage reviews and feedback, but without accurate employee data, the process can become messy.
By integrating Lattice with Workday, job titles and salaries stay synced and up to date. HR teams can run performance cycles with confidence, and once reviews are done, compensation changes flow back into Workday automatically — keeping both systems aligned and reducing manual work.
2. Streamline Employee Onboarding
Onboarding new employees is often a race against time , from getting payroll details set up to preparing IT access. With Workday, you can automate this process.
For example, by integrating an ATS like Greenhouse with Workday:
- As soon as a candidate is marked as “hired” in Greenhouse, their employee record is created automatically in Workday.
- Workday then provides HR teams with the new hire’s start date, address, job title, and department.
- This kickstarts payroll setup, benefits enrollment, and access provisioning without delays.
3. Add Users to Your Product Seamlessly
For SaaS companies, onboarding users efficiently is key to customer satisfaction. Workday integrations make this scalable.
Take BILL, a financial operations platform, as an example:
- When a new employee is added to a company’s Workday tenant, BILL automatically notifies admin users.
- Admins can then add these employees into the platform with one click.
- They can also bulk-import groups of employees for even faster setup.
4. Remove Users Quickly and Securely
Offboarding is just as important as onboarding, especially for maintaining security. If a terminated employee retains access to systems, it creates serious risks.
Platforms like Ramp, a spend management solution, solve this through Workday integrations:
- When an employee is marked as terminated in Workday (or another HRIS like Gusto), Ramp automatically flags their account.
- Admins can remove or lock the account with just a few clicks.
- In some cases, the employee’s account can remain open but with restricted permissions (like frozen cards).
While this guide equips developers with the skills to build robust Workday integrations through clear explanations and practical examples, the benefits extend beyond the development team. You can also expand your HRIS integrations with the Workday API integration and automate tedious tasks like data entry, freeing up valuable time to focus on other important work. Business leaders gain access to real-time insights across their entire organization, empowering them to make data-driven decisions that drive growth and profitability. This guide empowers developers to build integrations that streamline HR workflows, unlock real-time data for leaders, and ultimately unlock Workday's full potential for your organization.
Important Terminology of Workday API
Understanding key terms is essential for effective integration with Workday. Let’s look upon few of them, that will be frequently used ahead -
- Workday Tenant: Imagine your Workday tenant as your company’s own secure vault within the workday system. It’s a self-contained environment, and it will contain all your company’s data and configuration. Companies typically have separate tenants for development, testing, and production.
- Webhooks: Notifications that tell you when something changes (like a new employee added).
- Integration System User (ISU): This is like a “robot login” created just for apps and systems to connect to Workday. Instead of using a real person’s account, this special account is used only for integrations.
- OAuth 2.0: A modern way of logging in without sharing passwords. Apps get secure “keys” (tokens) to connect, and these keys can be refreshed automatically when they expire.
- REST API: A simple, modern way for apps to talk to Workday using easy-to-read data (JSON). It’s commonly used for cloud apps.
- SOAP API: An older method for apps to connect with Workday using more complicated data (XML). It’s often used for things like payroll and financial systems.
- PECI (Payroll Effective Change Interface): This feature automatically sends employee updates (like new hires, promotions, or exits) from Workday to payroll providers, so payroll stays accurate.
Overview of Workday API Documentation
1. API Types: Workday offers REST and SOAP APIs, which serve different purposes. REST APIs are commonly used for web-based integrations, while SOAP APIs are often utilized for complex transactions.
2. Endpoint Structure: You must familiarize yourself with the Workday API structure as each endpoint corresponds to a specific function. A common workday API example would be retrieving employee data or updating payroll information.
3. API Documentation: Workday API documentation provides a comprehensive overview of both REST and SOAP APIs.
- Workday REST API: The REST API allows developers to interact with Workday's services using standard HTTP methods. It is well-documented and provides a straightforward way to integrate with Workday.
- Workday REST API Documentation: Workday's REST API documentation provides detailed information on using the API, including endpoints, parameters, and response formats. It is a valuable resource for developers looking to integrate with Workday.
- Workday SOAP API Documentation: Workday's SOAP API documentation provides information on how to use the SOAP API for more complex transactions. SOAP APIs are often used for integrations that require a higher level of security and reliability.
- Workday SOAP API Example: An example of using Workday's SOAP API could be retrieving employee information from Workday's HR system to update a payroll system. This example demonstrates the use of SOAP APIs for complex transactions.
Authentication and Authorization in Workday
Workday supports two primary ways to authenticate API calls. Which one you use depends on the API family you choose:
SOAP APIs – ISU (Integration System User) + Password
SOAP requests are authenticated with a special Workday user account (the ISU) using WS-Security headers. Access is controlled by the security group(s) and domain policies assigned to that ISU.
REST APIs – OAuth 2.0 (Tokens)
REST requests use OAuth 2.0. You register an API client in Workday, grant scopes (what the client is allowed to access), and obtain access tokens (and a refresh token) to call endpoints.
When to use what
- Choose SOAP + ISU if you’re working with complex, highly structured business processes (e.g., payroll, certain staffing operations) and you need Workday’s strict WSDL contracts.
- Choose REST + OAuth if you’re building modern SaaS integrations that prefer JSON, simpler request/response patterns, and scope-based access control.
Security basics (that apply to both)
- Least privilege: Give your ISU/security groups or OAuth client only the permissions/scopes needed.
- Separate environments: Use different credentials for Sandbox vs. Production.
- Protect secrets: Store client secrets and passwords in a secure vault, not in code or repos.
- Rotate regularly: Rotate passwords/keys/tokens on a schedule.
- Audit & monitor: Enable logging, review access, and alert on failures or unusual activity.
Steps for building a Workday API Integration
To ensure a secure and reliable connection with Workday's APIs, this section outlines the essential prerequisites. These steps will lay the groundwork for a successful integration, enabling seamless data exchange and unlocking the full potential of Workday within your existing technological infrastructure.
- Setup up a Workday Developer Account: If you are new to Workday, sign up for a Workday developer account. This grants access to documentation, sample code, and APIs
- Explore Workday's API Playground: Get familiar with Workday API endpoints and resources. Download the API docs – they'll be your roadmap.
- Setup a Workday Tenant: A workday tenant is basically an instance of the Workday software. It is your orgs private area within Workday. You will need Tenant Credentials (Tenant Name, Username, Password), and appropriate roles and permissions within Workday.
- Setup an Integration System User (ISU): Once the Workday tenant is set up, you will need to enable API access in it. This typically involves creating a dedicated Integration System User (ISU) in Workday, assigning it to a security group, and configuring the necessary domain security policies.
- Register API Client: Register your API client within Workday to get a unique client ID and secret (like a secret handshake) for secure API calls. Store these credentials safely!
- Setup up OAuth 2.0: Workday supports OAuth 2.0. After registering your API client in the Workday system to obtain a Client ID and Client Secret, just use these credentials to request OAuth 2.0 access tokens, which are required by the Integration System User (ISU) for authenticating API calls.
- Pick between REST and SOAP: Workday supports both REST and SOAP protocols. You must pick between the two based on your requirements of integration performance, complexity, security and flexibility. While SOAP offers more security and is better suited for complex integrations, it can be slower in terms of data transfer speeds. On the other hand, REST is flexible and often recommended for lightweight integrations.
- Build your integration use case: Once you have decided which Workday API protocol suits you best, you need to write the actual code using the right APIs for your integration use case.
- Test your integration in a sandbox: After writing the integration code using Workday APIs, it is highly recommended to test the integration in a Workday sandbox. At times, it can be difficult to get access to a Workday sandbox, because Workday only provisions sandbox access to paid customers on certain plans. This is where working with Knit can help. Knit API provides Workday Sandbox access to its customers on the Scale and Enterprise plans for development and testing Workday integrations. Get in touch here.
- Deploy to production: Once tested on the Workday sandbox, your Workday API integration is all set to go live! Keep an eye on your integration – implement logging and monitoring for API calls. Review and update your integration settings as needed.
Now that you have a comprehensive overview of the steps required to build a Workday API Integration and an overview of the Workday API documentation, lets dive deep into each step so you can build your Workday integration confidently!
STEP 1: Setting up a Workday tenant and obtaining Web Services Endpoint
The Web Services Endpoint for the Workday tenant serves as the gateway for integrating external systems with Workday's APIs, enabling data exchange and communication between platforms. To access your specific Workday web services endpoint, follow these steps:
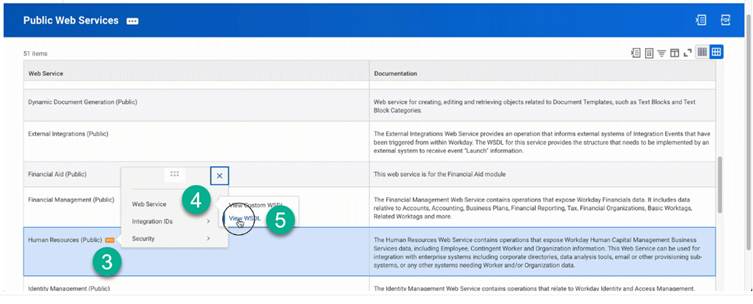
- Locate Public Web Services:
- In Workday, search for "Public Web Services".
- Open the "Public Web Services Report".
- Access the Human Resources WSDL:
- Hover over the "Human Resources" section.
- Click the three dots (ellipses) to open the menu.
- Select "Web Services" and then click "View WSDL".
- Find the Endpoint Host:
- On the page that opens, scroll to the bottom.
- Locate the host URL, which will look something like https://wd5-services1.myworkday.com/ccx.
- Copy the URL before /service.
STEP 2: Setting up an Integration System User (ISU) in Workday
Next, you need to establish an Integration System User (ISU) in Workday, dedicated to managing API requests. This ensures enhanced security and enables better tracking of integration actions. Follow the below steps to set up an ISU in Workday:
- Log into Workday:
- Access your Workday portal and log into your Workday tenant.
- Create an Integration System User:
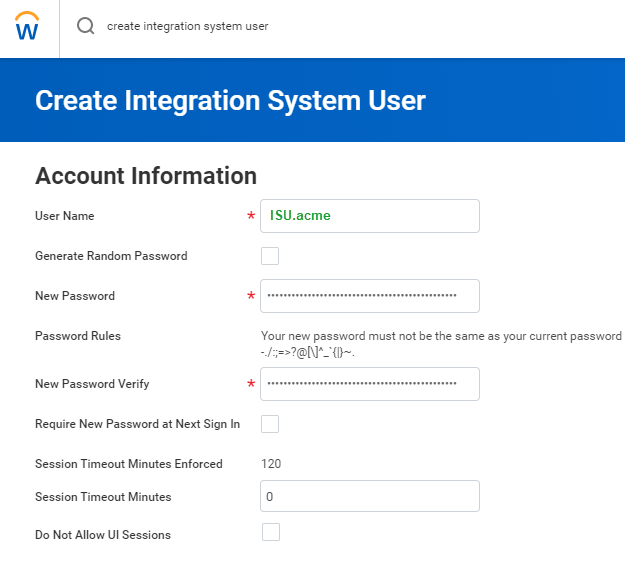
- In the search field, type "Create Integration System User" and select the corresponding task.
- Fill in User Details:
- On the "Create Integration System User" page, go to the "Account Information" section.
- Enter a username, and then enter and confirm the password.
- Do not select the Require New Password at the Next Sign In check box
- Type 0 (zero) for Session Timeout Minutes to prevent session expiration
- Click "OK" to save.
- Note: You'll want to add this user to the list of System Users to make sure the password doesn't expire.
- Create a Security Group and Assign an Integration System User: Now, add this Integration System User to a Security Group to ensure controlled access to Workday APIs, enhancing security by restricting permissions to authorized entities only:
- Create a Security Group: In the search field, type "Create Security Group" and select the task.
- Click "OK"
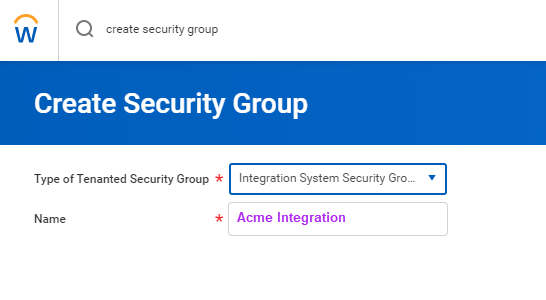
- Configure the security group
- On the "Create Security Group" page, select "Integration System Security Group" from the "Type of Tenanted Security Group" drop-down menu.
- In the "Name" field, enter a name for the security group.
- Click "OK".
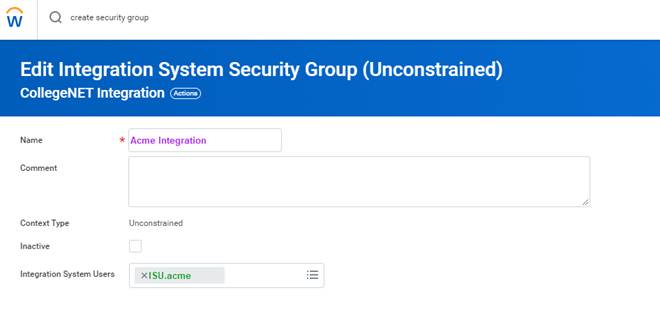
- Edit the security group
- On the "Edit Integration System Security Group (Unconstrained)" page, enter the same name you used when creating the ISU in the "Name" field.
- Click “OK”.
- Configure Domain Security Policy Permissions: Now, we need to ensure that the Integration System User (ISU) has the necessary access rights to interact with specific domains and perform operations within Workday's ecosystem. Here are the steps to configure Domain Security Policy Permissions for the same:
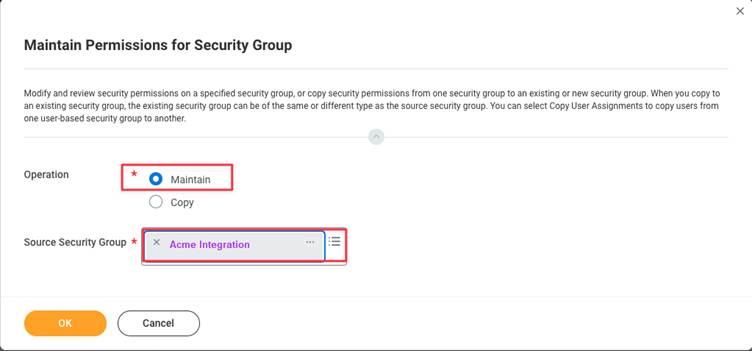
- Maintain Permissions for the Security Group:
- In the search field, type "Maintain Permissions for Security Group" and select the corresponding task.
- The "Maintain Permissions for Security Group" page will appear.
- Configure the Permissions:
- Select the necessary "Maintain” Operation.
- Ensure the "Source Security Group" name matches your created security group.
- Click “OK”
- Maintain Permissions for the Security Group:
- Add Domain Security Policy Permissions
- Add the required Domain Security Policy Permissions with the "GET" operation

Note: The permissions listed below are necessary for the full HRIS API. These permissions may vary depending on the specific implementation
Parent Domains for HRIS
- Job Requisition Data
- Person Data: Name
- Person Data: Personal Data
- Person Data: Home Contact Information
- Person Data: Work Contact Information
- Worker Data: Compensation
- Worker Data: Workers
- Worker Data: All Positions
- Worker Data: Current Staffing Information
- Worker Data: Public Worker Reports
- Worker Data: Employment Data
- Worker Data: Organization Information
Parent Domains for HRIS
- Candidate Data: Job Application
- Candidate Data: Personal Information
- Candidate Data: Other Information
- Pre-Hire Process Data: Name and Contact Information
- Job Requisition Data
- Person Data: Personal Data
- Person Data: Home Contact Information
- Person Data: Work Contact Information
- Manage: Location
- Worker Data: Public Worker Reports
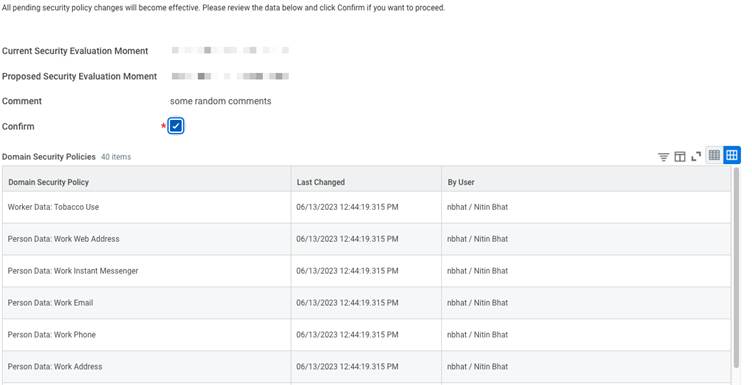
- Activate Security Policy Changes: Next, we will activate Security Policy Changes to ensure that any modifications made to security settings within the system take effect and are enforced.
- In the search bar, type "Activate Pending Security Policy Changes"
- Review the summary of the changes that need approval
- Approve the pending security policy changes to activate them
STEP 3: Setting up OAuth 2.0 in Workday
Workday offers different authentication methods. Here, we will focus on OAuth 2.0, a secure way for applications to gain access through an ISU (Integrated System User). An ISU acts like a dedicated user account for your integration, eliminating the need to share individual user credentials. Below steps highlight how to obtain OAuth 2.0 tokens in Workday:
- Retrieve Endpoints
- Access "View API Clients"
- Use the Workday search bar to navigate to "View API clients"
- At the top of the page, locate the base REST API endpoint
- Extract Host and Tenant Names
- The Workday REST API Endpoint format is: https://{host name}.workday.com/ccx/api/v1/{tenant name}.
- Retrieve and securely store the hostname and tenant name for future use in connecting to the Workday integration
- Obtain Workday REST Client ID: Now, we will need the Workday REST Client ID, which is necessary for authenticating and authorizing API requests, ensuring secure access to Workday's resources. Here are the steps to get your Workday REST Client ID
- Access Workday Application: Log in to the Workday application
- Register API Client: Navigate to the "Register API Client" section
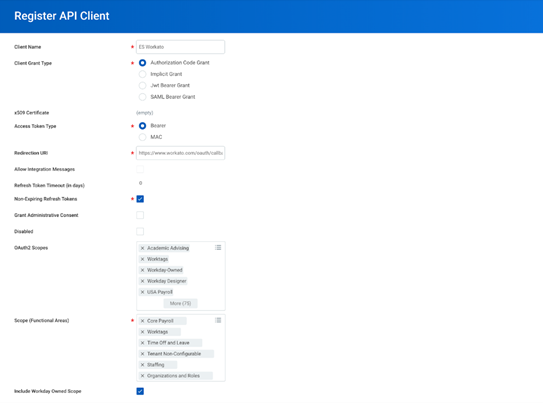
- Enter Client Details
- In the "Client Name" field, input the desired name for the client
- Choose "Authorization Code Grant" for the "Client Grant Type"
- Set Access Token Type: Select "Bearer" as the access token type.
- Select Scope Values: From the Workday REST API scopes, select the relevant functional areas
- Benefits
- Candidate Engagement
- Core Compensation
- Organizations and Roles
- Performance Enablement
- Pre-Hire Process
- Recruiting
- Staffing
- Time Off and Leave
- Time Tracking
- Worker Profile and Skills
- Generate Client ID and Client Secret: Click "OK" to generate the Client ID and Client Secret.
- Enter Client Details
- Obtain Workday REST Refresh Token: If you want your application to have continuous access to Workday data without needing to reauthenticate frequently, you should use the Workday REST Refresh token. Here are the steps you can follow to obtain your Workday REST Refresh token
- Log in to Workday
- Access API Client Information
- In the search field, type "View API client" and select the corresponding task
- Click on the "API Clients for Integrations" tab.
- Select the relevant API client that you created
- Manage Refresh Tokens
- Choose "Manage Refresh Tokens for Integrations"
- Enter the ISU account you generated in the "Workday Account" field
- Click "OK" and return to the Workday home page
- Generate New Refresh Token
- Select the "Generate New Refresh Token" option on the "Delete or Regenerate Refresh Token" page
- Set "Non-Expiring Refresh Token" to "Yes"
- Click "OK
- Copy Refresh Token
- On the "Successfully Regenerated Refresh Token" page, copy the refresh token provided and store securely. These refresh tokens will be used to generate access tokens for authenticating your ISU when accessing Workday APIs.
STEP 4: SOAP vs. REST: Picking the Right Workday API for the Job
When building a Workday integration, one of the first decisions you’ll face is: Should I use SOAP or REST?
Both are supported by Workday, but they serve slightly different purposes. Let’s break it down.
SOAP - The Structured and Secure Option
SOAP (Simple Object Access Protocol) has been around for years and is still widely used in Workday, especially for sensitive data and complex transactions.
Advantages of SOAP APIs
How to work with SOAP:
- Download the WSDL file for the service you want (e.g., Human Resources, Staffing).
- Use tools like SOAP UI or cURL to send XML-based requests.
- Authenticate with an ISU (Integration System User) username and password.
REST - The Flexible and Modern Choice
REST (Representational State Transfer) is the newer, lighter, and easier option for Workday integrations. It’s widely used in SaaS products and web apps.
Advantages of REST APIs
How to work with REST:
- Use the REST endpoint URL for your tenant. Example: https://{host}.workday.com/ccx/api/v1/{tenant}
- Authenticate with OAuth 2.0 tokens.
- Test requests easily with tools like Postman or directly from your code.
Which One Should You Choose?
STEP 5: Building your Workday API integration (With Examples)
Now that you have picked between SOAP and REST, let's proceed to utilize Workday HCM APIs effectively. We'll walk through creating a new employee and fetching a list of all employees – essential building blocks for your integration. Remember, if you are using SOAP, you will authenticate your requests with an ISU user name and password, while if your are using REST, you will authenticate your requests with access tokens generated by using the OAuth refresh tokens we generated in the above steps.
In this guide, we will focus on using SOAP to construct our API requests.
First let's learn about constructing a SOAP Request Body
SOAP requests follow a specific format and use XML to structure the data. Here's an example of a SOAP request body to fetch employees using the Get Workers endpoint:
<soapenv:Envelope
xmlns:soapenv="http://schemas.xmlsoap.org/soap/envelope/"
xmlns:bsvc="urn:com.workday/bsvc">
    <soapenv:Header>
        <wsse:Security>
            <wsse:UsernameToken>
                <wsse:Username>{ISU USERNAME}</wsse:Username>
                <wsse:Password>{ISU PASSWORD}</wsse:Password>
            </wsse:UsernameToken>
        </wsse:Security>
    </soapenv:Header>
    <soapenv:Body>
        <bsvc:Get_Workers_Request xmlns:bsvc="urn:com.workday/bsvc" bsvc:version="v40.1">
        </bsvc:Get_Workers_Request>
    </soapenv:Body>
</soapenv:Envelope>
👉 How it works:
- The <wsse:Security> block carries the ISU login credentials.
- The <bsvc:Get_Workers_Request> tells Workday which API function you’re calling.
- You can add filters, limits, or extra fields inside the request body as needed.
Now that you know how to construct a SOAP request, let's look at a couple of real life Workday integration use cases:
Use Case 1: Creating a New Employee: Hire Employee API (SOAP Example)
Let's add a new team member. For this we will use the Hire Employee API! It lets you send employee details like name, job title, and salary to Workday. Here's a breakdown:
- What it Does: Adds a new employee to your Workday system.
- What it Needs: Employee details like name, job information.
curl --location 'https://wd2-impl-services1.workday.com/ccx/service/{TENANT}/Staffing/v42.0' \
--header 'Content-Type: application/xml' \
--data-raw '<soapenv:Envelope xmlns:bsvc="urn:com.workday/bsvc" xmlns:soapenv="http://schemas.xmlsoap.org/soap/envelope/">
    <soapenv:Header>
        <wsse:Security>
            <wsse:UsernameToken>
                <wsse:Username>{ISU_USERNAME}</wsse:Username>
                <wsse:Password>{ISU_PASSWORD}</wsse:Password>
            </wsse:UsernameToken>
        </wsse:Security>
        <bsvc:Workday_Common_Header>
            <bsvc:Include_Reference_Descriptors_In_Response>true</bsvc:Include_Reference_Descriptors_In_Response>
        </bsvc:Workday_Common_Header>
    </soapenv:Header>
    <soapenv:Body>
        <bsvc:Hire_Employee_Request bsvc:version="v42.0">
            <bsvc:Business_Process_Parameters>
                <bsvc:Auto_Complete>true</bsvc:Auto_Complete>
                <bsvc:Run_Now>true</bsvc:Run_Now>
            </bsvc:Business_Process_Parameters>
            <bsvc:Hire_Employee_Data>
                <bsvc:Applicant_Data>
                    <bsvc:Personal_Data>
                        <bsvc:Name_Data>
                            <bsvc:Legal_Name_Data>
                                <bsvc:Name_Detail_Data>
                                    <bsvc:Country_Reference>
                                        <bsvc:ID bsvc:type="ISO_3166-1_Alpha-3_Code">USA</bsvc:ID>
                                    </bsvc:Country_Reference>
                                    <bsvc:First_Name>Employee</bsvc:First_Name>
                                    <bsvc:Last_Name>New</bsvc:Last_Name>
                                </bsvc:Name_Detail_Data>
                            </bsvc:Legal_Name_Data>
                        </bsvc:Name_Data>
                        <bsvc:Contact_Data>
                            <bsvc:Email_Address_Data bsvc:Delete="false" bsvc:Do_Not_Replace_All="true">
                                <bsvc:Email_Address>employee@work.com</bsvc:Email_Address>
                                <bsvc:Usage_Data bsvc:Public="true">
                                    <bsvc:Type_Data bsvc:Primary="true">
                                        <bsvc:Type_Reference>
                                            <bsvc:ID bsvc:type="Communication_Usage_Type_ID">WORK</bsvc:ID>
                                        </bsvc:Type_Reference>
                                    </bsvc:Type_Data>
                                </bsvc:Usage_Data>
                            </bsvc:Email_Address_Data>
                        </bsvc:Contact_Data>
                    </bsvc:Personal_Data>
                </bsvc:Applicant_Data>
                <bsvc:Position_Reference>
                    <bsvc:ID bsvc:type="Position_ID">P-SDE</bsvc:ID>
                </bsvc:Position_Reference>
                <bsvc:Hire_Date>2024-04-27Z</bsvc:Hire_Date>
            </bsvc:Hire_Employee_Data>
        </bsvc:Hire_Employee_Request>
    </soapenv:Body>
</soapenv:Envelope>'
Elaboration:
- We use `curl` to send a POST request (because we're creating something new).
- The URL points to the specific Workday endpoint for hiring employees. We include our tenant name in the URL to point the API to our corresponding tenant.
- We include the ISU Username and Password in the <wsse:Security> header in the SOAP envelope to authenticate our API call
- The `Content-Type` header specifies we're sending xml data.
- The actual employee data goes in the request body, including details like first name, position, work email.
Response:
<bsvc:Hire_Employee_Event_Response
xmlns:bsvc="urn:com.workday/bsvc" bsvc:version="string">
<bsvc:Employee_Reference bsvc:Descriptor="string">
<bsvc:ID bsvc:type="ID">EMP123</bsvc:ID>
</bsvc:Employee_Reference>
</bsvc:Hire_Employee_Event_Response>
If everything goes well, you'll get a success message and the ID of the newly created employee!
Use Case 2: Fetching All Employees: Get Workers API (SOAP Example)
Now, if you want to grab a list of all your existing employees. The Get Workers API is your friend!
- What it Does: Retrieves a list of all employees in your Workday system.
- What it Needs: Your ISU username and password
- Where it's Used: The Workday Get Workers API is part of the Workday Developer API suite, which allows developers to interact with Workday's Human Capital Management (HCM) system programmatically. These APIs are commonly used for integrating Workday data and functionality into other applications and systems.
Below is workday API get workers example:
curl --location 'https://wd2-impl-services1.workday.com/ccx/service/{TENANT}/Human_Resources/v40.1' \
--header 'Content-Type: application/xml' \
--data '<soapenv:Envelope
xmlns:soapenv="http://schemas.xmlsoap.org/soap/envelope/"
xmlns:bsvc="urn:com.workday/bsvc">
<soapenv:Header>
<wsse:Security>
<wsse:UsernameToken>
<wsse:Username>{ISU_USERNAME}</wsse:Username>
<wsse:Password>{ISU_USERNAME}</wsse:Password>
</wsse:UsernameToken>
</wsse:Security>
</soapenv:Header>
<soapenv:Body>
<bsvc:Get_Workers_Request xmlns:bsvc="urn:com.workday/bsvc" bsvc:version="v40.1">
<bsvc:Response_Filter>
<bsvc:Count>10</bsvc:Count>
<bsvc:Page>1</bsvc:Page>
</bsvc:Response_Filter>
<bsvc:Response_Group>
<bsvc:Include_Reference>true</bsvc:Include_Reference>
<bsvc:Include_Personal_Information>true</bsvc:Include_Personal_Information>
</bsvc:Response_Group>
</bsvc:Get_Workers_Request>
</soapenv:Body>
</soapenv:Envelope>'This is a simple GET request to the Get Workers endpoint.
Elaboration:
- The URL points to the specific Workday endpoint for retrieving employees.We include our tenant name in the URL to point the API to our corresponding tenant.
- We include the ISU Username and Password in the <wsse:Security> header in the SOAP envelope to authenticate our API call
- The `Content-Type` header specifies we're sending xml data.
- We include the Count and Page Number parameters in the request to paginate the results. This technique can be used to optimize the results so that we process a batch of data at once.
Response:
<?xml version='1.0' encoding='UTF-8'?>
<env:Envelope xmlns:env="http://schemas.xmlsoap.org/soap/envelope/">
<env:Body>
<wd:Get_Workers_Response xmlns:wd="urn:com.workday/bsvc" wd:version="v40.1">
<wd:Response_Filter>
<wd:Page>1</wd:Page>
<wd:Count>1</wd:Count>
</wd:Response_Filter>
<wd:Response_Data>
<wd:Worker>
<wd:Worker_Data>
<wd:Worker_ID>21001</wd:Worker_ID>
<wd:User_ID>lmcneil</wd:User_ID>
<wd:Personal_Data>
<wd:Name_Data>
<wd:Legal_Name_Data>
<wd:Name_Detail_Data wd:Formatted_Name="Logan McNeil" wd:Reporting_Name="McNeil, Logan">
<wd:Country_Reference>
<wd:ID wd:type="WID">bc33aa3152ec42d4995f4791a106ed09</wd:ID>
<wd:ID wd:type="ISO_3166-1_Alpha-2_Code">US</wd:ID>
<wd:ID wd:type="ISO_3166-1_Alpha-3_Code">USA</wd:ID>
<wd:ID wd:type="ISO_3166-1_Numeric-3_Code">840</wd:ID>
</wd:Country_Reference>
<wd:First_Name>Logan</wd:First_Name>
<wd:Last_Name>McNeil</wd:Last_Name>
</wd:Name_Detail_Data>
</wd:Legal_Name_Data>
</wd:Name_Data>
<wd:Contact_Data>
<wd:Address_Data wd:Effective_Date="2008-03-25" wd:Address_Format_Type="Basic" wd:Formatted_Address="42 Laurel Street&#xa;San Francisco, CA 94118&#xa;United States of America" wd:Defaulted_Business_Site_Address="0">
</wd:Address_Data>
<wd:Phone_Data wd:Area_Code="415" wd:Phone_Number_Without_Area_Code="441-7842" wd:E164_Formatted_Phone="+14154417842" wd:Workday_Traditional_Formatted_Phone="+1 (415) 441-7842" wd:National_Formatted_Phone="(415) 441-7842" wd:International_Formatted_Phone="+1 415-441-7842" wd:Tenant_Formatted_Phone="+1 (415) 441-7842">
</wd:Phone_Data>
</wd:Worker_Data>
</wd:Worker>
</wd:Response_Data>
</wd:Get_Workers_Response>
</env:Body>
</env:Envelope>This JSON array gives you details of all your employees including details like the name, email, phone number and more.
Use a tool like Postman or curl to POST this XML to your Workday endpoint.
REST Example
If you used REST instead, the same “Get Workers” request would look much simpler:
curl --location 'https://{host}.workday.com/ccx/api/v1/{tenant}/workers' \
--header 'Authorization: Bearer {ACCESS_TOKEN}'- Here, you don’t need XML or SOAP envelopes.
- You just pass your OAuth token in the Authorization header.
- The response will be in JSON, making it easier to parse in modern applications.
STEP 6: Test your integration in a Workday Sandbox
Before moving your integration to production, it’s always safer to test everything in a sandbox environment. A sandbox is like a practice environment; it contains test data and behaves like production but without the risk of breaking live systems.
Here’s how to use a sandbox effectively:
1. Request a Sandbox
Ask your Workday admin to provide you with a sandbox environment. Specify the type of sandbox you need (development, test, or preview). If you are a Knit customer on the Scale or Enterprise plan, Knit will provide you access to a Workday sandbox for integration testing.
2. Prepare Your Sandbox
Log in to your sandbox and configure it so it looks like your production environment. Add sample company data, roles, and permissions that match your real setup.
3. Create a Test ISU (Integration System User)
Just like in production, create a dedicated ISU account in the sandbox. Assign it the necessary permissions to access the required APIs.
4. Register Your App for Secure Calls
Register your application inside the sandbox to get client credentials (Client ID & Secret). These credentials will be used for secure API calls in your test environment.
5. Run Tests
Use tools like Postman or cURL to send test requests to the sandbox. Test different scenarios (e.g., creating a worker, fetching employees, updating job info). Identify and fix errors before deploying to production.
6. Monitor and Debug
Use Workday’s built-in logs to track API requests and responses. Look for failures, permission issues, or incorrect payloads. Fix issues in your code or configuration until everything runs smoothly.
STEP 7: Move your integration to Workday production
Once your integration has been thoroughly tested in the sandbox and you’re confident that everything works smoothly, the next step is moving it to the production environment. To do this, you need to replace all sandbox details with production values. This means updating the URLs to point to your production Workday tenant and switching the ISU (Integration System User) credentials to the ones created for production use.
When your integration is live, it’s important to make sure you can track and troubleshoot it easily. Setting up detailed logging will help you capture every API request and response, making it much simpler to identify and fix issues when they occur. Alongside logging, monitoring plays a key role. By keeping track of performance metrics such as response times and error rates, you can ensure the integration continues to run smoothly and catch problems before they affect your workflows.
If you’re using Knit, you also get the advantage of built-in observability dashboards. These dashboards give you real-time visibility into your live integration, making debugging and ongoing maintenance far easier. With the right preparation and monitoring in place, moving from sandbox to production becomes a smooth and reliable process.
A note on PECI (Payroll Effective Change Interface)
PECI (Payroll Effective Change Interface) lets you transmit employee data changes (like new hires, raises, or terminations) directly to your payroll provider, slashing manual work and errors. Below you will find a brief comparison of PECI and Web Services and also the steps required to setup PECI in Workday
Feature: PECI
- Data Flow: Outbound
- Use Cases: READ
- Country Scope: Some limit
- Setup: Usually Advanced
Feature: Web Services
- Data Flow: Inbound and Outbound
- Use Cases: CREATE, UPDATE, DELETE
- Country Scope: Global
- Setup: Usually Programmatic, Flexible
PECI set up steps :-
- Enable PECI: Talk to your Workday admin and get PECI activated for your tenant.
- Set Up Your Payroll Provider: Configure your external payroll system within Workday, including details and data transfer protocols.
- Define Your Data: Identify the specific data your payroll provider needs (think employee details, compensation, etc.).
- Create an ISU: Just like other integrations, create a special user (ISU) with permissions to access and move payroll data.
- Transform Your Data: Set up Workday to transform your data into the format your payroll provider expects. Think of it as translating languages!
- Schedule Transfers: Automate the process! Set up a schedule to regularly send payroll changes to your provider (e.g., daily or after each payroll run).
- Test It Out: Before going live, use the Workday sandbox to thoroughly test the PECI integration. Make sure all changes get sent correctly.
- Monitor & Maintain: Keep an eye on things! Regularly monitor the integration and use Workday's reports to track data transfers and fix any errors.
Webhooks in Workday
Workday does not natively support real-time webhooks. This means you can’t automatically get notified whenever an event happens in Workday (like a new employee being hired or someone’s role being updated). Instead, most integrations rely on polling, where your system repeatedly checks Workday for updates. While this works, it can be inefficient and slow compared to event-driven updates.
How Knit Helps with Virtual Webhooks
This is exactly where Knit Virtual Webhooks step in. Knit simulates webhook functionality for systems like Workday that don’t offer it out of the box.
Knit continuously monitors changes in Workday (such as employee updates, terminations, or payroll changes). When a change is detected, it instantly triggers a virtual webhook event to your application. This gives you real-time updates without having to build complex polling logic.
For example: If a new hire is added in Workday, Knit can send a webhook event to your product immediately, allowing you to provision access or update records in real time — just like native webhooks.
Things to keep in mind for Workday Integration security
- Craft Security Groups: In Workday Security, create a security group specifically tailored for your integration. Think of it as a club with specific access rules.
- Set Up Security Policies: Define security policies to control how data can be accessed and modified. Assign these policies to your security group for an extra layer of protection.
- Assign Permissions Wisely: Adopt a least privilege policy. Add the necessary permissions to your security group. Make sure your ISU has access to everything it needs, but nothing it doesn't.
- Activate & Audit: Activate your newly defined security policies and regularly review their effectiveness. Conduct security audits to ensure everything is running smoothly.
- Store Secrets Safely: Keep sensitive info like client secrets in environment variables, not in your code.
- Encryption is Key: Encrypting credentials for added protection is a must for integration.
- Rotate Regularly: Keep changing credentials periodically to reduce risk.
Troubleshooting common issues with Workday Integration
Getting stuck with errors can be frustrating and time-consuming. Although many times we face errors that someone else has already faced, and to avoid giving in hours to handle such errors, we have put some common errors below and solutions to how you can handle them.
- Authentication Woes:
- Error Message: "Invalid client ID or secret."
- Possible Solution: Double-check your OAuth setup. Are your client ID, secret, and redirect URLs all correct? Ensure your tokens aren't expired!
- Permission Denied:
- Error Message: "Access denied!"
- Possible Solution: Verify your ISU has the right permissions. Check security group settings and policies. It might not have the key to the data vault!
- Data Mismatch Blues:
- Error Message: "Incorrect or missing data fields."
- Possible Solution: Ensure your data mappings are on point and match Workday's data model. Validate your input data before making those API calls. Garbage in, garbage out!
- Rate Limiting Roadblock:
- Error Message: "Whoa there! Too many requests!"
- Possible Solution: Implement throttling and retry logic in your integration. Respect Workday's API rate limits – don't be a data hog!
Tips for Integrating with Workday’s API
Integrating with Workday can unlock huge value for your business, but it also comes with challenges. Here are some important best practices to keep in mind as you build and maintain your integration.
1. Choose the Right Authentication Method
Workday supports two main authentication methods: ISU (Integration System User) and OAuth 2.0. The choice between them depends on your security needs and integration goals.
- ISU (Integration System User):
This method allows you to create a dedicated system account with specific permissions. It’s great when you want granular access control based on Workday roles. Every action is tied to this system user, making activity easy to track. - OAuth 2.0:
OAuth is more flexible and widely used across platforms. It lets you define scopes (what the integration can and cannot do), which reduces risk by limiting access. OAuth is especially useful for REST APIs and when you need user-specific permissions or dynamic access. It’s also an industry standard, making it easier to integrate with other systems.
2. Plan Your Go-to-Market Strategy
If your integration is customer-facing, don’t just focus on building it , think about how you’ll launch it. A Workday integration can be a major selling point, and many customers will expect it.
Before going live, align on:
- How it will be priced (part of the product or an add-on).
- How it will be supported (customer support and documentation).
- How it will be marketed (website, sales demos, case studies).
- How it will be demoed (showing real-life workflows).
This ensures your team is ready to deliver value from day one and can even help close deals faster.
3. Consider Outsourcing for Reliability
Building and maintaining a Workday integration completely in-house can be very time-consuming. Your developers may spend months just scoping, coding, and testing the integration. And once it’s live, maintenance can become a headache.
For example, even a small change , like Workday returning a value in a different format (string instead of number) , could break your integration. Keeping up with these edge cases pulls your engineers away from core product work.
A third-party integration platform like Knit can solve this problem. These platforms handle the heavy lifting , scoping, development, testing, and maintenance , while also giving you features like observability dashboards, virtual webhooks, and broader HRIS coverage. This saves engineering time, speeds up your launch, and ensures your integration stays reliable over time.
How can Knit help you with Workday API Integration?
We know you're here to conquer Workday integrations, and at Knit (rated #1 for ease of use as of 2025!), we're here to help! Knit offers a unified API platform which lets you connect your application to multiple HRIS, CRM, Accounting, Payroll, ATS, ERP, and more tools in one go.
Advantages of Knit for Workday Integrations
- Unified APIs: Interact with multiple HRIS systems (including Workday) via a single REST interface.
- Developer-Friendly: Clear documentation, fewer complexities.
- Scalability: Designed to handle high-volume data flows.
- Support & Reliability: Helpful support team, robust error handling.
Getting Started with Knit
- Sign Up for a Knit account.
- Connect Workday: Provide your Workday tenant details.
- Leverage Unified API: Perform typical Workday operations without dealing directly with SOAP.
REST Unified API Approach with Knit
- Freed from SOAP complexities.
- Straightforward JSON requests.
- Centralized platform to manage data from multiple HRIS solutions.
Workday API integration FAQs
Q. What is a Workday integration?
A Workday integration is a connection built between Workday and another system (like payroll, CRM, or ATS) that allows data to flow seamlessly between them. These integrations can be created using APIs, files (CSV/XML), databases, or scripts , depending on the use case and system design.
Q. What is a Workday API integration?
A Workday API integration is a type of integration where you use Workday’s APIs (SOAP or REST) to connect Workday with other applications. This lets you securely access, read, and update Workday data in real time.
- Internal integrations: Your company connects Workday with tools you already use (e.g., syncing payroll or performance data).
- Customer-facing integrations: Your product connects directly with your customers’ Workday systems (e.g., provisioning employees into your SaaS).
Q. Do Workday integrations require coding?
It depends on your approach.
- Custom-built integrations usually require coding, especially when using SOAP or REST directly. Your developers will need to handle authentication, endpoints, and error handling.
- Using an iPaaS (Integration Platform as a Service) or an embedded iPaaS/unified API platform like Knit can reduce or even eliminate coding by providing pre-built Workday connectors and simplified endpoints.
Q. What types of APIs does Workday provide?
Workday offers:
- SOAP APIs: Traditional, XML-based APIs with strict schemas. Often used for payroll, benefits, and complex workflows.
- REST APIs: Modern, lightweight APIs using JSON. Easier to use and more common for real-time SaaS integrations.
Q. What are Workday’s API rate limits?
Workday doesn’t publish all rate limits publicly. Most details are available only to customers or partners. However, some endpoints have documented limits , for example, the Strategic Sourcing Projects API allows up to 5 requests per second. Always design your integration with pagination, retry logic, and throttling to avoid issues. The safest approach is to implement exponential backoff on all retry logic, paginate all list operations regardless of expected result size, and avoid polling intervals shorter than 5 minutes for background sync jobs. If you're consuming Workday data through Knit, rate limit management is handled automatically — Knit spaces requests and retries within Workday's thresholds so your application never hits limits directly.
Q. What are the benefits of integrating with Workday’s API?
- Internal integrations: Save time, reduce manual errors, improve employee experience, and boost productivity.
- Customer-facing integrations: Help you win more deals, improve customer retention, and expand into new markets (e.g., selling to larger enterprises who expect Workday support).
Q. How do I access a Workday sandbox account?
Workday provides sandbox environments to its customers for development and testing. If you’re a software vendor (not a Workday customer), you typically need a partnership agreement with Workday to get access. Some third-party platforms like Knit also provide sandbox access for integration testing.
Q. How do you authenticate with Workday’s API?
Workday supports two main methods:
- Integration System User (ISU): Username and password for a dedicated system account. Easier to manage for non-sensitive integrations.
- OAuth 2.0: Modern authentication using tokens. More secure, supports SSO, and enforces least-privilege access. Recommended for most cases, especially customer-facing integrations.
Q. Does Workday offer APIs?
Yes. Workday provides both SOAP and REST APIs, covering a wide range of data domains, HR, recruiting, payroll, compensation, time tracking, and more. REST APIs are typically preferred because they are easier to implement, faster, and more developer-friendly.
Q. Does Workday support API integrations?
Yes. If you are a Workday customer or have a formal partnership, you can build integrations with their APIs. Without access, you won’t be able to authenticate or use Workday’s endpoints.
Q. Does Workday support webhooks?
No, Workday does not natively support outbound webhooks - there is no mechanism to push real-time change events to an external endpoint when an employee record is created, updated, or terminated. The standard alternative is polling: querying Workday's APIs on a schedule (typically every 15–60 minutes) to detect changes. Knit solves this with virtual webhooks — when you connect Workday through Knit, you receive real-time event notifications via webhook whenever data changes in Workday, without needing to build or maintain any polling infrastructure. This is particularly valuable for use cases that require fast response to Workday events, such as automated onboarding workflows triggered by new hires or access revocation triggered by terminations.
Q. How long does it take to build a Workday integration?
A custom Workday integration built directly against Workday Web Services typically takes 4–12 weeks for a single integration, factoring in ISU setup, OAuth configuration, SOAP/REST endpoint selection, data model mapping, error handling, and testing in sandbox before production. That timeline doesn't include ongoing maintenance as Workday releases new API versions. Using Knit's unified API, teams can go from zero to a production Workday integration in 1–3 days - Knit handles authentication, data normalization, rate limiting, and webhook delivery, so your engineering team only needs to integrate once against Knit's normalized API rather than Workday's raw endpoints directly. See https://developers.getknit.dev for implementation guides.
Q: What is a Workday API?
Workday API is a programmatic interface that allows external applications to read and write data in Workday - including employee records, payroll data, org structures, benefits, and time tracking. Workday offers two API types: SOAP-based Web Services (the older, more comprehensive set using XML) and REST APIs (modern, JSON-based, covering a growing set of domains). Both require formal authentication through an Integration System User (ISU) or OAuth 2.0 client. For SaaS products that need to access Workday data on behalf of their customers, Knit provides a unified API that normalizes Workday's data into a consistent schema alongside 100+ other HRIS platforms.
Q: What is the difference between Workday REST API and SOAP API?
Workday's SOAP API (Web Services) is the older, more comprehensive set - it covers virtually every Workday domain including payroll, benefits, and complex HR transactions, uses XML, and requires constructing SOAP envelopes with WS-Security headers. Workday's REST API is newer, uses JSON, supports OAuth 2.0, and is simpler to implement - but it has narrower domain coverage than the full SOAP Web Services suite. For most new integrations, start with the REST API; fall back to SOAP for payroll, compliance-critical operations, or endpoints not yet exposed via REST. Knit abstracts both API types behind a single normalized endpoint, so you don't need to choose or maintain separate implementations.
Q: How much does Workday API integration cost?
Building a Workday integration directly has no per-call API cost from Workday itself - access to the API is included with Workday licenses. The real cost is engineering time: a custom integration typically takes 4–12 weeks of developer time to build and requires ongoing maintenance as Workday updates its API. Third-party tools vary: iPaaS platforms like Workato charge per task or connection; unified APIs like Knit charge per active connection per month, with pricing that covers authentication, data normalization, rate limiting, and webhook delivery. For SaaS teams building customer-facing Workday integrations at scale, unified API pricing is typically more predictable than task-based pricing as connection volume grows.
Q. What’s the difference between PECI and Workday Web Services?
- PECI (Payroll Effective Change Interface): Outbound-only, sends payroll-related changes (like hires, raises, terminations) to payroll providers.
- Workday Web Services (APIs): Inbound + outbound, supports create, update, and delete operations across HR, payroll, recruiting, and more.
Appendix
A. Key Terms
- API: Lets applications talk to Workday (RESTful or SOAP).
- Authentication: Verifies you're who you say you are (login).
- Authorization: Grants access to specific Workday data (permissions).
- Client ID & Secret: Uniquely identify your application (secure handshake).
- Data Model: Structure of Workday data (like fields in a form).
- Endpoint: Specific URL to access Workday functions (like a door to a room).
- ISU: Special user for integrations (low access, high security).
- OAuth 2.0: Secure way to get temporary access tokens (like a one-time pass).
- REST API: Flexible API using regular commands (GET, POST, PUT, DELETE).
- Sandbox: Test environment with dummy data (safe zone for experimentation).
- SOAP API: Structured API using XML (more complex, more secure).
- Token: Temporary permission to access Workday (like a short-term pass).
- Workday Tenant: Your company's secure space within Workday (separate for dev, test, production).
B. Sample Code
- Adapted from Workday API documentation. Remember to replace placeholders like "your_workday_tenant", "isu_username", “isu_password” with your actual details. For comprehensive API reference and code samples, visit the Workday Developer Center
.webp)

%20(3).png)
.webp)
.png)
.webp)

